This week the April Alpha Pole Challenge is wrapping up as the month of April comes to an end. This month my pole progress has been touch and go. I started out strong as the month began and throughout the last couple of weeks I've barely had time to touch my pole. The weather has been getting warmer which has brought me outdoors to work on our courtyard garden. I live inner city and have been learning all about the trials and tribulations of being a homeowner with very limited outdoor areas. Last year we decided to grow some grass in our courtyard and do some hardscaping along our very small space. Unfortunately, three of our azaleas we planted did not take and I decided to redo the entire area where they were planted. This year's project includes pots, statues, fountains, and new patio furniture. I've decided to do a complete overhaul of our outdoor living space and making it a serene getaway. The hardest challenge I've found myself tackling has been creating a water feature and making use of an area that is completely shaded and lacks the ground soil to nurture the growth of plants. Anyway, enough about landscaping- I can write an entirely different blog about that as a lifestyle feature piece in the future once everything is complete.
On to the pole challenge progress! This week I have posted my challenge contributions to my Pole Harmony Instagram. I will be uploading videos for my final letters V, W, X, and Z. U and Y will be a picture posted. Below are the moves I've chosen and my quick recap of challenges I've observed.
U: Unicorn. I found this one on IG (Instagram) when searching for a move that began with U. As the everyone has been posting their challenge entries, I've also noticed this one to be called the Stargazer. I like Unicorn as a better term for this move.
V: Vortex. I realized when reviewing my video I was initially going to submit that this move didn't quite look right. My arm placement was incorrect and as I'm writing this, I am planning to redo this one and will be posting my entry late.
W: Wrist Seat Spin. I LOVE this spin and really enjoyed teaching this one to my students when I owned my studio. It was always a class favorite.
X: X climb. Such a tricky way to climb because of that back foot needing to be pointed. This has always been a pet peeve of mine and something I strive to always achieve in my climbing technique. It just cleans everything up and makes use of those leg muscles in the process.
Y: Yogini. Wow. It's been awhile since this one has been attempted and I found myself struggling to maintain a hold.
Z: Z-Spin. I struggled with this letter. I found a spin on IG that I attempted to replicate and instead came up with my own variation after many trial and error attempts. This one is a lot of fun once you figure out the proper positioning for each leg and arm.
Thank you to Instagram user Tropical Vertical for coming up with this amazing and fun monthly challenge! I really enjoyed participating and seeing what everyone else was posting. To check out all the entries, be sure to use the hashtag #aprilalphapole.

Exploring the art of creative expression through movement
Thursday, April 28, 2016
Tuesday, April 26, 2016
DragonTail Pole Move Revisited
 |
| 12/20/13 and 4/6/2016 |
My assessment brought me to the conclusion that the arm that stretches overhead allows for more bend in the back. I decided to test this theory and it just so happens that is exactly what needed to occur for this move to work. Here's a video of me doing this move properly and ending it into the superman.
Thursday, April 21, 2016
April Alpha Pole Challenge Progress Post #3
J: Janiero. It's been a couple years since I last tried this move and I was surprised to nail it after two

K: Kneehold. This one hurts on a 40mm pole. A LOT.
L: Layback variation. I found this pose on instagram and loved it! Very easy and very pretty.
M: Marley. Another move I haven't attempted for a couple years. This one looks pretty tight and after reviewing others doing this move, it appears my tight quads are keeping this move from opening up and looking as beautiful as I'd like it to on me.
N: No handed Teddy or V legs. I couldn't think of a move that starts with the letter N so I got creative and threw in the no handed teddy. A staple and a long time favorite move that needed to be included on this list.
O: Ornament. I realize its not officially called the Ornament but this is actually what I used to call this move or also the Hood Ornament rather than the Figurehead.
P: Pencil. Entered using the iguana mount. I tried deadlifting into it and with all my yoga headstand practice I was surprised it didn't happen. It's pretty hard to tip your hips over your shoulders in this grip.
Q: Queen. Another pose found on instagram and surprisingly really hard to get into. I got into this

R: Reverse Grab (see video posted to my instagram)
S: Scorpio. Also known as inner leg hang. A beautiful foundational move.
T: Tulip. Never tried this one before. I like it. At first there was no way I was going to elbow grip it for fear I may fall. I finally got the courage after a few times up on the pole when regular grip wasn't getting me into the shape I wanted and like magic the elbow grip pulled me in to a nice little pancake looking side straddle on the pole.
I realize this blog post is a couple days ahead of schedule so I will pick back up on Monday with my letters U and V as video uploads and complete the list in next Thursday's progress post.
Tuesday, April 19, 2016
GymTote Review
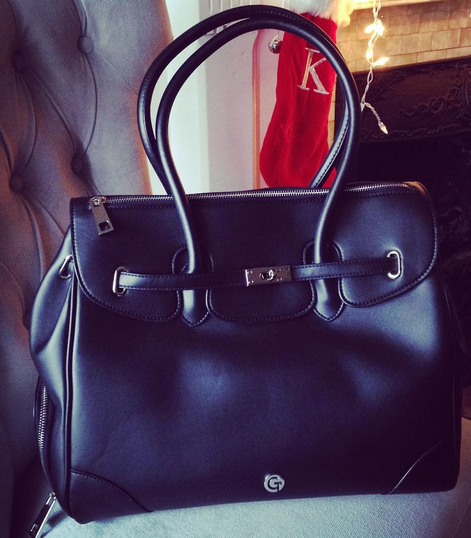
My search lead me back to the designer style GymTote. I decided to do a little more research on this UK based company. The Founder of GymTote, Helena Searcaigh, was once on a similar quest for the perfect gym bag like me! Her situation called for a bag that had the versatility to go from the office to the gym without the need for two different bags. The GymTote brand was designed with professionalism in mind. Supporting a company that was on a smaller scale compared to more well known larger companies also appealed to me in making my decision. I opted for the black Eva tote. I ordered my GymTote from the UK based website for £125. US conversion plus shipping cost me $209.12.
The bag is very durable and of high quality. The zippers are smooth and work easily. The bag itself is designed with extra compartments that readily accommodate gym accessories. The GymTote website lists all features of the bag as follows:
FEATURES
- Top handbag compartment with additional slip & zip pockets for all your small items - in our signature silver stripe lining
- Top zip on flap to access your handbag essentials in a flash
- Separate, back-facing base compartment in our ultralight water-resistant silver nylon for your gym kit - no more pulling out your sports bra in meetings!
- Exterior pull out sleeve pocket for trainers in our ultralight, water-resistant silver nylon
- Mesh eyelets in the base & trainer compartments to keep your sweaty kit well ventilated
- Extra soft, padded handles help make it comfortable to carry when fully loaded. Longer over-the-shoulder handles make sure it fits nicely under your arm & over your winter coat
- Separate water bottle pocket in our ultralight, water-resistant silver nylon
- Exterior zipped phone/mp3 pocket with eyelet to hold your earphone cord = secure tunes*


My favorite part of the bag are all the compartments! I'm able to carry everything I need for all the variety of fitness classes I attend. For my Yoga mat, I place it on top of the bag and it holds well in place with the bag's handles. Other bags offered by GymTote do have a Yoga mat holder beneath the bag. I did not feel this was necessary for my needs. Upon researching the information I provided for this blog post, I discovered that GymTote now has a US distributing website: www.GymTote.us! Unfortunately as I am writing up this post, it appears all the products available are out of stock on the US website. GymTote's Facebook claims new inventory will arrive in April/May so if this hot item is on your list, be sure to stalk their social media so you will know when inventory is restocked to place your order.
I am extremely satisfied with my purchase. I take my bag to the YMCA and it fits well inside the lockers in the women's lock room. I've also taken it to pole studios where it discreetly carries my stilettos and all the necessary pole related gear while looking like a designer hand bag. I'll be posting a blog in the near future titled, "What's in My Gym Bag?" I wrote a "What's in My Gym Bag" blog back in 2012 titled "A Pole Dancer Exposed: What's in My Bag?" If you'd like to read that blog, check it out by clicking here. A lot has changed since then but I thought was fun to look back at what I used to carry on me versus what's in my bag now. Have you found the perfect gym bag? Please feel free to share by commenting below!
Thursday, April 14, 2016
#AprilAlphaPole Challenge Progress Post # 2: G is for Gemini
G is for Gemini, also known as the Outer Leg Hang. A staple move for those first learning to invert on the pole. Aerial Amy (fellow pole community member blogger) recently posted on Facebook a post about the importance of the inner and outer leg hang duo as foundational moves for pole fitness.
 Original post can be viewed here: https://www.facebook.com/Aerialamyy/posts/929469423839388
I have always hammered into my students that the leg hangs are your go to safety moves. If a move fails, you can lower or catch yourself into either leg hang. I will often end new tricks in leg hangs for a controlled dismount off the pole. It's so important that you develop a strong leg hang on both inner and outer so it becomes a natural part of your muscle memory. The above status by Aerial Amy gives some great areas for pole dancers to start working on strengthening this move. But what kind of conditioning exercises can be done close to or on the ground that will work on muscle groups specifically for leg hangs?
I put together a short routine that safely works on increasing the knee pit grip strength necessary for strong leg hangs. For advanced training, you can also wear stilettos or ankle weights when performing these conditioning exercises.
Exercise Challenge: If you're really wanting to challenge yourself and to go along with the AlphaPole theme, instead of drawing inside and outside circles during the leg hang exercises, you can draw the letters of the alphabet with your free leg's toe.

I have always hammered into my students that the leg hangs are your go to safety moves. If a move fails, you can lower or catch yourself into either leg hang. I will often end new tricks in leg hangs for a controlled dismount off the pole. It's so important that you develop a strong leg hang on both inner and outer so it becomes a natural part of your muscle memory. The above status by Aerial Amy gives some great areas for pole dancers to start working on strengthening this move. But what kind of conditioning exercises can be done close to or on the ground that will work on muscle groups specifically for leg hangs?
I put together a short routine that safely works on increasing the knee pit grip strength necessary for strong leg hangs. For advanced training, you can also wear stilettos or ankle weights when performing these conditioning exercises.
Routine: Leg Hang Conditioning
- Grounded invert hip lifts x 10 from left side of pole
- Grounded invert hip lifts x 10 from right side of pole
- Right side of pole outer leg hang leg lifts x 10
- Right side of pole outer leg hang knee tucks x 10
- Right side of pole outer leg hang catchers hang/diamond legs x 10
- Right side of pole outer leg hang inside circles x 5, outside circles x 5
- Right side of pole inner leg hang leg lifts x 10
- Right side of pole inner leg hang knee tucks x 10
- Right side of pole inner leg hang catchers hang/diamond legs x 10
- Right side of pole inner leg hang inside circles x 5, outside circles x 5
- Left side of pole outer leg hang leg lifts x 10
- Left side of pole outer leg hang knee tucks x 10
- Left side of pole outer leg hang catchers hang/diamond legs x 10
- Left side of pole outer leg hang inside circles x 5, outside circles x 5
- Left side of pole inner leg hang leg lifts x 10
- Left side of pole inner leg hang knee tucks x 10
- Left side of pole inner leg hang catchers hang/diamond legs x 10
- Left side of pole inner leg hang inside circles x 5, outside circles x 5
Exercise Challenge: If you're really wanting to challenge yourself and to go along with the AlphaPole theme, instead of drawing inside and outside circles during the leg hang exercises, you can draw the letters of the alphabet with your free leg's toe.
Tuesday, April 12, 2016
Getting the Best Camera View When Recording Your Pole or Aerial Progress
 |
| Fisheye Lens with clip from Amazon.com |
I may be late to the game on this one but when I was searching for a solution to my limited camera capabilities, my results didn't produce many answers. I was skimming through instagram videos of smaller home pole spaces as I now am a fellow small space home poler, when I came across a post that mentioned a fisheye lens for camera phones. I was immediately intrigued on how this tiny lens changes the capabilities of my camera on my phone. To be honest, I do have a higher quality video camera but its quite tedious to load videos onto my laptop and edit them in i-movie. Once I've edited, I usually have to wait for the i-movie file to produce my final product. It just takes too long! I don't always want to upload a beautifully edited piece from my workouts. Sometimes its just a quick share on instagram or Facebook where I want to share my latest accomplishments with my friends. I'd like to get the best view of my area I'm working with and if you're a poler or aerialist then you know the struggles of capturing movement from the floor and across the air.
Upon searching for the perfect fisheye lens, I read many reviews on amazon before coming to the decision to order this one: http://www.amazon.com/gp/product/B00QXT58JA?psc=1&redirect=true&ref_=oh_aui_detailpage_o00_s00
The Mpow 3 in 1 Clip-On 180 Degree Supreme Fisheye + 0.67X Wide Angle + 10X Macro Lens for iOS Android Smartphones comes with 3 lenses and an easy to use clip that is placed over your camera view finder on the front or back of your phone. I used the clip on my front camera so I could be sure I was filming the area I wanted and didn't notice any problems. You do have to make sure the lens is positioned appropriately so you don't get blacked out edges.
Check out my video comparisons below. The first video is without the fish eye lens and the second video is with.
Check out my video comparisons below. The first video is without the fish eye lens and the second video is with.
Thursday, April 7, 2016
#AprilAlphaPole Challenge Progress Post # 1

This month's community pole challenge is Tropical Vertical's instagram #AprilAlphaPole. Every day of the month of April will represent a letter of the alphabet with Sundays being rest days.
I've been working on some of the moves through my own list I've compiled for this challenge. Some moves I haven't visited in years. I found myself challenged in trying to figure out how my body can contort into a few of the tricks I haven't done in quite awhile. Some poses used to be prettier at other particular moments in time compared to now. I've lost some back flexibility- which is something I've been actively working on and will be sharing more about in a future blog post. So here is my progress for letters A-E (see picture in post or on instagram.)
List of Moves:
A: Allegra
B: Butterfly
C: Cupid
D: Dragontail
E: Eros
My struggles: back flexibility. Where did it go?
 | |
| DragonTail 12/20/2013 vs 4/4/2016 |
- Allegra: I felt like my head should have been higher and closer to my top leg. I did get a pretty shape but you would not believe how many times I attempted this one. Entry from Flatline Scorpio turned into inner leg hang to spare my energy as I was only on letter A.
- Butterfly: This move has always been pretty solid for me. Why is it when you're up in the move you feel like your back hooked leg's foot is right next to your head and then upon examining your video on playback it's light years away?
- DragonTail: Not sure why I did this one. I was stumped on moves that started with the letter D. I could have hooked that back right leg to complete the "tail" of the move but all my concentration was fixated on my grip. I have a side by side comparison to show the depreciation in my back flexibility on this one- which I feel would have given this move the little bit of umph it needed. It also shows that I'm also not fully extending the left arm over my head and grabbing the pole. (This is why it's always good to go back over your execution plan and map out where each leg and arm are supposed to be in your final product.) Planning fail. It's quite possible that the over head arm placement could be exactly what I needed to arch my back a little more into this move thus creating the illusion of back flexibility. I'll have to test this theory out and will post an update on my findings.
What moves did you choose for the first week of the challenge? Feel free to comment below your #AprilAlphaPole picks. Follow my instagram for my next couple of letters as a few worked best in video sharing versus pictures.
Tuesday, April 5, 2016
5 Tips for the Basics of Apparatus Dance Flow

1. Point your toes. We've all heard this time and time again but for beginners who have never had any prior dance experience, pointing your toes can often be a difficult concept to master among learning all the other skills of apparatus dancing. Over time, the more you practice pointing your toes it'll become a part of your muscle memory and you will find yourself naturally pointing in every movement. As students advance to climbs on the pole, it is also important to point the back foot to complete the aesthetic of clean lines. This is a skill that will develop as particular muscles used for climbing strengthen. I see a lot of pole dancers that are strong enough that do not do this which is why I felt this particular skill was worth mentioning in this section.
2. Shoulder engagement. Instructional cues are often verbalized as shoulders back and down, shoulder blades neutral, and chest lifted. There are a lot of moves in both pole and aerial that require the use of the shoulder girdle muscles. Properly engaging these muscles ensures a safe practice that protects the muscles from injury. For a more in depth article on shoulder engagement, read BadKitty's recently posted blog written by Rebecca Stokes "Shoulder Engagement for Polers and Aerialists." (3/23/2016)
3. Slow and controlled movements. In pole classes, I would cue my students by telling them, "Slow is sexy." The reasoning behind this slow it down approach wasn't only because movements look better slowed down; slowing down movement builds muscle strength through the act of control. Slowing moves down also exude confidence from the dancer. You have time to think about properly executing your next movement which can be extremely important when up in the air on your apparatus for obvious safety reasons.
4. Balance is essential. Develop your skills bilaterally. There will always be one side of your body that is stronger and things come naturally to you when performed on that particular side. Even though one side is easier, it's important to train all movement on the opposite or less than easy side of your body. You may not feel like you're using muscles on the opposite side of your body when you're performing skills on your "good" or "favorite" side. These muscles are still engaged and offer support to the focused area you are fully engaging. Strengthening the muscles on your "bad" or "not favorite" side will assist you in preventing future injuries. I always enjoyed working my opposite side skills as it becomes a mental workout in addition to the physical workout I'm getting. Pole and aerial can literally be a total body, mind, and soul workout.
5. Listen to your body. Hydrate, nutritionally support, and rest when needed. Hydration and food are no brainers. Rest can be defined as many things other than not training on your apparatus. As blogger and Physiotherapist for the International Pole Championship Selina Tannenburg writes in her blog "Training and Recovery" (7/24/2014), rest days can consist of restorative work such as a massage, relaxing bath, or active resting activities such as light work outs that are different from your apparatus training. My favorite active rest day activity is stretching followed by some full body foam roller action. For more on the topic of rest, check out my previous blog post from 2013, "Rest."
Sunday, April 3, 2016
Saturday, April 2, 2016
New Design!
I have been thinking a lot lately about the direction I'd like this little piece of the internet I claim as my own the take. Since closing my studio and surrendering my roles and responsibilities as a studio owner, I have had a lot of time to consider how I'd like to go about utilizing the content I'd acquired and created over the years. I felt it was best to continue with my blog and to also include areas where I could make use of resources I have at my disposal. I hope you enjoy the new look and layout of my blog. I am working on linking the domain www.poleharmony.com to this blog so eventually (if not already) the blog's web address will change. I need my husband to help me figure that one out or at least to wait the full twenty four hours for the domain to work. Please feel free to suggest any additional upgrades you'd like to see. I will be reclaiming my former Pole Harmony social media accounts as the blog's so if you have been following Pole Harmony on Facebook or Instagram, all content from here on out shared will be about my latest blog posts and additions to the new site. Thank you for continuing to read and support my writing and I hope you enjoy the new direction and design elements to my blog!
Subscribe to:
Posts (Atom)